I have distinctly Northern Chinese food tastes, despite being Hong Kong born and bred, and always make a beeline for the fried noodles and fried dumplings first. That said, I won’t say no to a soupy bowl of wonton noodles if there’s a bottle of Chinese vinegar nearby to douse it in… But at home there are only a few noodle recipes that I dare to cook myself, and I’m always on the look out for new ones to try. When I saw this on the frankly quite awesome The Woks of Life blog, the noodles looked too tasty to be true… (where true = easy!)
So wrong!
So so wrong that this is already become my favourite home-cooked noodle dish, hands down 🙂 It really does taste as good as it looks – slick, chewy udon noodles, loaded with satisfyingly savoury mushrooms that go perfectly with sweet bites of pork, and bak choy to round everything out. Seriously, what’s not to love? A quick marinade and quick cook time means you can be tucking into a bowl of these in about 20 minutes!
This recipe didn’t need any tinkering, it really was perfect as it was and the only changes I made were to ‘Britishify’ some of the ingredients. The real trick to this dish, for me, is slicing the pork nice and thin so that it doesn’t need much cooking and avoids getting all tough and chewy. The noodles, however, I just can’t resist leaving in the wok to get a little bit of char on them, because who doesn’t love that ‘breath of the wok’ flavour 🙂
The recipe uses a few store cupboard staples rather than needing a spoonful of something you have to buy especially, and then will forget to use again before it rots in the back of the fridge, which just makes it even better still. And the marinade is so simple but so flavoursome that I’ve even started using it with some old mum-taught Chinese recipes… shhhh! Don’t tell her!
Shanghai Fried Noodles
2015-07-12 18:53:49
Serves 2
These delicious wok fried noodles are satisfyingly savoury and, with just a handful of ingredients, ridiculously easy to rustle up.
1 packet of fresh shiitake mushrooms, thinly sliced
1 packet of Amoy's straight to wok udon noodles
2 1/2 tsp dark soy sauce
2 1/2 tsp soy sauce
1/4 tsp sugar
1 small bunch baby bok choy, roughly chopped
Marinade...
In a small bowl (soup bowl size is perfect) mix together the marinade ingredients before adding the sliced pork and giving it all a good stir about to coat. Set aside for 10 minutes.
Stir fry...!
In a wok heat 1 tbsp of oil on a high heat. Add the pork stir-fry for 2-3 minutes, until browned, before removing to a plate.
Turn the heat down to medium and heat another tbsp or two of oil before adding the sliced mushrooms and stir-frying for about 2 minutes.
Next add the noodles to the wok straight from the packet and gently break up with chopsticks. Once the noodles are 'free', add the soy sauces and sugar.
Toss the pork back in and stir-fry everything together until the noodles are an even, deep brown colour.
Add the bok choy last and mix in with the noodles until they have wilted right down.
Notes
A few generous splashes of Chinese vinegar goes great with this dish! If you don't have any, good old British malt vinegar is a very acceptable substitute.
Ditch the pork for a veggie friendly version.
Throw your whole pork chop in the freezer for about 30 minutes and it should slice thinly more easily.
Summer feels like it’s on the way out already – boo hiss – but I’m not quite ready to break out the winter warmers yet so here’s a dish from Hubby that’s perfect for inbetween the seasons and, in a very rare departure for me, carb-less. Left to my own devices I’d happily stockpile rice or pasta for every dinner, but this dish does that magical thing of making the missing carbs unmissed! It is, quite honestly, the only meal with no carbs that I actually look forward to as opposed to the usual pouting.
So what’s to love about it? The saltiness of the Teriyaki is perfectly tempered by cool crisp lettuce, with additional crunch and texture brought to you by water chestnuts and toasted cashews. It also reminds me a little (a lot!) of something we used to order at a Chinese restaurant in Hong Kong (that was confusingly!) called the American Restaurant. Then again, as its the American in our house who cooks all the Asian food and not the half Chinese, maybe it wasn’t such a daft name after all…
We like to use turkey mince for this (thigh or breast are both good), it’s super lean and lets us feel smug for one meal for eating well, but it works just as well with pork or beef mince 🙂
Start by preheating the oven to 200C and roasting the cashew nuts - spread the nuts out on a baking tray and pop in the oven for about 8 minutes.
While the nuts are roasting, rinse the spring onions before topping and tailing, and then chop (or snip with scissors) all the way down, separating green parts to one side and white parts to another
Tip the mince into a medium sized mixing bowl, or any bowl of an equivalent size that will give you enough room to mix everything up. Toss in a handful of the white bits of spring onion, add the minced garlic, 2 tbsp Terriyaki sauce, sprinkle over 1 tsp sugar and then 1 tsp corn starch. Season with white pepper before mixing thoroughly. Leave to marinade for about 20 minutes
While the mince is marinading, drain and rinse the water chestnuts. Roughly chop and then stir into marinading meat mixture.
Also while the mince is marinading, take the roasted cashew nuts and crush roughly. Hubby likes to pop them in a freezer bag before taking a rolling pin to them - it's mess-less and very theraputic apparently!
Place a wok over a medium flame and add 2 tsp vegetable oil. When the oil is heated add the marinaded meat and give it a good toss around the wok before leaving it to cook through - this should take a couple of minutes.
Add the crushed cashew nuts to the wok and tossing everything around again before turning the heat up to high.
Add the shaoxing/sherry and ketjup manis/soy and cook for about five minutes, or until the meat is browned through.
While the meat is finishing cooking, separate the lettuce leaves and then wash and drain them - or give them a good shake - and then pile them up on a plate.
When the meat is browned and looks ready, add another 100ml (1/3rd cup) terriyaki and then taste and season or add more sugar if required. Cook for a further five minutes, until most of the cooking liquid has absorbed.
If you still need to thicken the sauce then add 1 tsp corn starch to 3 tsp water and mix into a paste before adding to the meat and stirring through. Keep it on a high heat for about a minute to thicken.
Plate up the mince and scatter the green bits of spring onion over it just before serving with the lettuce leaves.
Notes
That rarest of things, a carb-less dish that I actually look forward to!
Another great foodgawker find! This recipe is from a blog called Picture The Recipe which is spot on because the picture of it totally lured me in. And then I read the ingredients… I have to be honest, the idea of cooking with mayo didn’t inspire me, but this looked too good not to give it the benefit of the doubt. And I’m sure I’ve seen Hellmann’s promoting recipes that heat up mayo so I figured I’d give it a go and trust in the blog.
Don’t let the mayo put you off, there was not a clean plate in the house!! It was quite rich but a little sauce goes a long way, which is just as well because this isn’t a dish that comes with loads of jup. Next time I’ll serve it with some stir fried brocolli, or bak choi, the green will really temper that richness the mayo brings. The other thing that really recommends this is how easy it was to put together, the whole egg wash flouring thing really sounds more flaff than it actually is. And baking the chicken still gives you that lovely velvetting texture from the egg/flour coating but in a much more healthy way than frying it. I’m off now to check out the other recipes on that blog 🙂
Orange Chicken in a Chinese Stylee
2014-08-16 21:32:16
Mayo is the surprise ingredient in this delicious asian inspired orange chicken.
Get your rice on an pre-heat the oven to 200C/400F.
In a medium sized bowl whisk together the eggs, hot sauce and 1 tsp of the garlic salt. Add the chicken to the egg mix and stir well so that every piece is coated.
In a medium sized shallowish bowl mix together the flour, the other 1 tsp of garlic salt and the pepper.
This is where I snap on the CSI vinyl gloves! Take 3 or 4 pieces of the eggy chicken and roll them around the seasoned flour until they’re coated all over. Space them out on a baking sheet.
Pop in the oven and bake for 15 minutes which should cook the pieces through.
While the chicken is cooking get the sauce ready by mixing together the mayonnaise, orange juice, orange zest, sweet chilli sauce and salt to season. It won’t look pretty at first (understatement!), all lumpy and sort of curdled, but once you get whisking those lumps should disappear, although you might need to persevere a bit to get rid of all of them.
Pour the sauce into a wok, or similar sized pan, and set aside until the chicken is cooked. The chicken pieces will still look quite floury in places but don’t worry, we have plans for that flour later! Then, change your setting from oven to grill and put the chicken pieces under for about 5 minutes, or until there are some lovely brown bits on the chicken.
While you’re grilling the chicken pieces, put the sauce on a medium-high heat until it’s gently boiling and then turn it down to simmer. When the chicken is ready to come out from under the grill, put the pieces into the sauce and coat well. The floury bits of the chicken will come loose and thicken the sauce, which should start to look glossy.
Give it a couple of minutes and once you’re happy with the thickness of the sauce add some snipped chives, mix through, plate up, scatter a few more snipped chives on top for show, and serve!
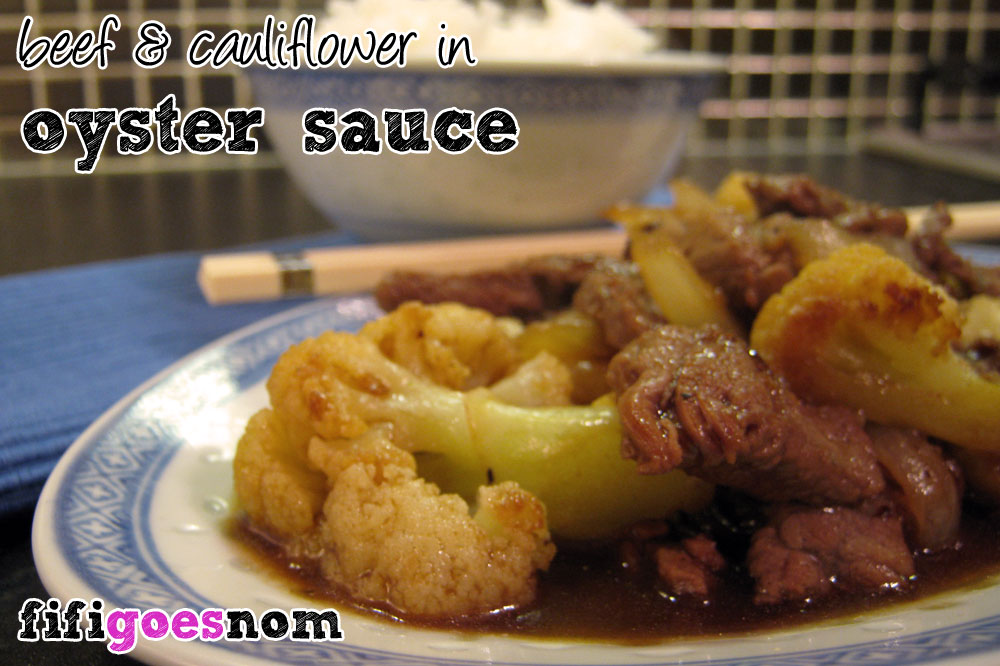
A seasonal recipe! Cauliflower is very October, which is all the excuse I needed to make this tonight. I’m sure I must have learnt this from my mum although I can’t actually remember her making it in living memory… Anyway! Promise you it’s better than its takeaway equivalent 🙂 Don’t be put off by the prep and cook time, mostly it’s time spent leaving stuff to do its thing so is not as heinous as it might look at first glance.
Cut up the cauliflower and put the pieces into a collander, wash thoroughly and leave to dry. Slice the onions, and mince or finely chop the garlic.
In a medium sized bowl (anything bigger than a cereal bowl should be fine) mix the oil, cornstarch and sugar for the marinade. You’re aiming for a consistency like runny honey so add a little more oil if its too thick or a little more cornstarch if its too thin.
Next, slice the rump steak very thinly – a Chinese cheat is to put it in the freezer an hour beforehand – and then add the slices to the marinade bowl and stir well to coat the steak. Leave for 15-30mins.
Cook!
Heat a generous tbsp of oil in the wok over a medium high heat and then add the cauliflower pieces and stir-fry for 2-3 minutes (I like to let the edges singe a little). Season well with salt (and a spinkle of chicken powder if you have any) before adding a cup of water. Put a lid on it and turn the heat right up until all the water has evaporated. When the wok is “dry” again remove the cauliflower to a plate and set aside.
Put the wok back on a medium heat and add about a tbsp of oil. When it’s hot add the sliced onion and stir-fry until they are soft and translucent. Add the minced/chopped garlic and keep it moving about in the oil for about a minute without letting it burn before adding the marinaded steak. Keep moving everything to break up any clumps of steak or onions and to ensure an even stir fry.
As soon as the steak is sealed and browned all over (don’t worry if there are a few bits still pink) tip the cauliflower back into the wok and then add 4-5 good shakes of oyster sauce straight out of the bottle.
Stir to coat everything in the wok well, then add 1/2 to 1 cup of cold water and stir again. The cornstarch in the marinade should thicken the sauce a little as the added water heats up. When the liquid starts to bubble at the edges turn the heat down until the sauce is simmering and leave it for about five minutes.
Edinburgh has a habit of losing good dim sum chefs almost as soon as they get them. First gust of that cold Winter North wind through Auld Reekie and the chefs flee back to warmer climes i.e. London. So we’ve learnt not to get attached to any new dim sum restaurants that start up because the deliciousness is usually fleeting. But! The Imperial Palace seems to have bucked the trend and has continued to produce good dim sum for well over a year now. Joy! At last, we don’t have to travel south to indulge in a decent dim sum frenzy (although when in London it would be remiss not to…).
Hubby and I probably hit up Imperial Palace at least once a month, either with the whole family or just the two of us or with visiting friends. Like this Saturday when we were there with one of my besties who was over visiting from California, and who is no stranger to good dim sum.
We ate our own body weight in delectable bites of steamed and fried goodness, and then some, all washed down with a lovely pot of green tea…
Hubby is a sucker for Char Sui Bau, and the ones at the Imperial Palace do not disappoint with pillowy white buns that are hot and steamy and slightly sweet, breaking open to reveal the treasure of sticky chinese barbecued pork inside. I was told that these are the Chinese equivalent to Yorkshire Puddings in that you stuff the children full of them and save all the really good dim sum for the grown ups! Unfortunately, that trick doesn’t quite work with Hubby. Possibly because we all dive into them too!
I’m a total dumpling addict, so we had Har Gau (a little bit bigger than the perfectly bite sized ones you get in Hong Kong but just as tasty) which I can’t eat without lashings of chilli oil, as well as Shanghai Dumplings which come in a basket of nine… NINE!!! I will actually give up other stuff to have these and can’t leave until they’re all eaten, such is my addiction (don’t judge me!)
The Glutinous Rice in Lotus Leaf was perfectly sticky and perfectly flavoured with the rice infused by the leaf. I don’t always recognise the meat inside it so left a rather large bit that seemed to be mostly bone to one side, but I’m sure it added to the flavour of the rice.
We had Beef Cheung Fun as well, which really is best described as chinese cannelloni! The Imperial Palace ingeniously serves the sweet soy sauce separately in its own bowl which negates the otherwise frustrating and futile attemps to spoon any of the sauce off the flat plate the Cheung Fun is served on with a big chinese spoon. Best eaten as soon as it arrives though, otherwise the rice noodle gets really claggy when it cools down.
And finally… Prawn and Garlic spring rolls, which were Hubby’s particular request. They make a nice change from the usual spring rolls, but I find them quite garlicky so can take them or leave them (definitely leave if there are still Shanghai Dumplings to eat!).
There wasn’t a hope in hell of us finishing off with noodles or the tasty little egg custard tarts, so we paid up and rolled out and in the direction of home.
We’ll be back 🙂 As will I, properly, once Autumn kicks in – am really rubbish at summer type food plus it’s been crazy busy of late, but after such a damp squib of a summer I’m ready for those colder nights and the comfort food that goes with it!